


CORA-X lite is a portable applicaton to protect your sensitive data. CORA stands for context ordered replacement algorithm. CORA Cyber Security Inc empowers data security and cloud security in a manner that supersedes encryption. CORA is quantum safe (safe from all computers including quantum computers) cryptography for your data security.
CORA-X lite allows individuals, teams, businesses, offices, and organizations to secure their data.
This application uses the CORA API which can be used to protect any application, cloud or enterprise solution. The CORA API incorporates our MUPs (Multiple Use Pads) and CORA blocs to provide probabilistic encryption rather than factorization based which is one of the reasons why quantum computers will not break CORA.
The Information is presented (except in small viewing devices, such as a smartphone) along the left side of the browser and the Topics are "Affixed" to the right side of the browser.
If your viewing width is less than 768px then the Affixed Topics are hidden and the Information is presented on its own.
Thanks to jQuery and Bootstrap, these help files should be continuously readable and usable on any device or browser.
The topic, or sub-topic you are viewing will be reflected in the color and marker shown in the Affixed Topic section.
You may jump quickly to any topic by clicking/pressing on it in this Affixed Topic pane.

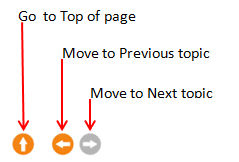
When you link to a particular topic, through an internal hyperlink, or the Affixed topic pane, an entry in the history chain is created and available for you to quickly move back and forth using the arrows at the bottom of the page.
In this example, the Next icon is disabled, meaning that you are at the right end of the history chain; there aren't any other topics that have been linked to after this current topic.
Quantum safe means that, no computer, including quantum computers, will break CORA's encryption.
This relys on you, the user, properly implement CORA-X with best practices; after all, the best 'safe' in the world only works 'if' you lock it, and don't leave the keys on top of the safe.
Safety, security and protection... what are these all about? Let's start with a brief analogy, think of your home. Security is like the locks on your doors and windows; it is important to secure your home. This prevents most unwanted visitors from violating your space, your home - they need your permission to enter.
Despite your best efforts, some thieves might break in without your permission. How might you protect your valuables? With a safe. Yes, this safe provides an additional level of protection, however, if the thief takes your safe home, then they have all the time in the world to crack it open.
In the digital world, this safe is better known as encryption. When standard forms of encryption lock a file, that file is essentially in a safe.
The problem here is that, if a thief takes the "safe" with the data from the server, they have all the time in the world to break it open.
Unlike a physical safe which is heavy and difficult to carry, when a computer is hacked, the digital files are light and easy to carry away.
This just isn't good enough, and that is where CORA comes in to play!
CORA is an acronym. CORA takes parts of the original file and breaks them up into different pieces (containers). More importantly, these
fragments are chosen in a context based manner so that, if someone steels one of them, they don't have enough to put "anything together".
Imagine encrypting a file, then breaking it into two pieces... this isn't context based! Each piece can provide "too much information" about the original file.
With CORA, we don't want the thieves to know anything, not even a single word from the original file!
CORA is a probabilistic encryption that relies on unfathomably large probabilities rather than complex mathematical algorithms. This makes CORA safe even when Quantum computers become a reality that breaks all other current standards of encryption.
Why CORA is unbreakable when properly implemented and used! Let us consider the main layers to CORA:
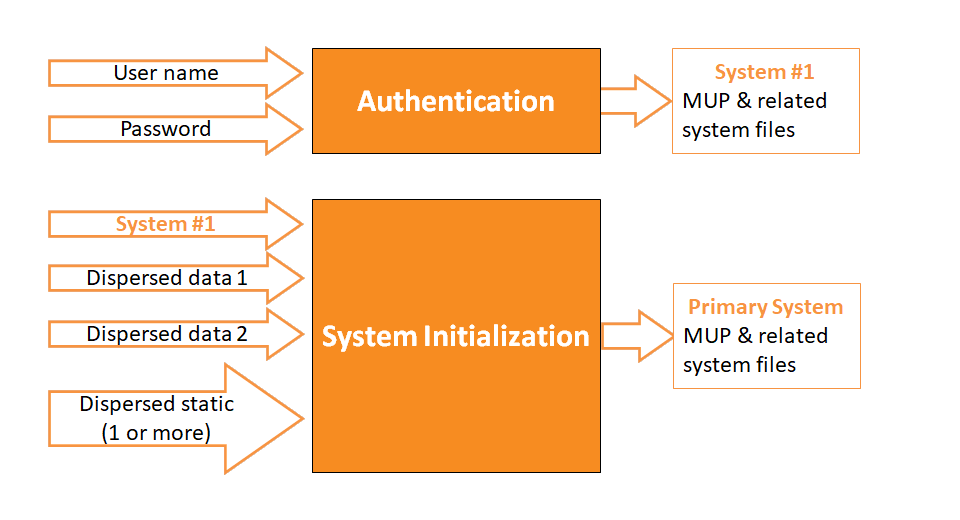
Notice above that the user must 'authenticate', then, the user must install the Encryption package which includes their MUP, which is different for every user, and at least 1 million bits long.
Why does this matter? Consider other forms of encryption, such as 1024 bit AES. This encryption always uses 1024 bits. It isn�t like yours might be 1025 bits and mine is 1031 bits. Here at CORAcsi, we don�t like giving away �any information� to a hacker or thief.
Lets talk about 1,000,000+ bit Encryption. How much stronger is a 1,000,000 bit encryption compared to a 2048? It is 10 300,413 times stronger; a number that we simply cannot relate to, however, consider that the age of our universe is approx 10 17 seconds old.
Note:
CORA-X lite is designed to have a user initialized their system once when this application is first opened so that there isn�t a risk of a thief discovering which dispersed files are used to generate the system files.
Ideally this application will run until it is time to restart the computer. The user may lock and unlock CORA-X lite as often as needed, rather than closing then opening the application which would require loading the system each time.
So you don't believe our wildly ambitious claim that CORA is quantum safe; that not even quantum computers can break CORA.
Cool, that�s great! We want you to try!
In fact, we want to host a hackathon in which we will give away a �Tesla� if you can break CORA.
Go ahead and get a head start. If you break CORA at any time, at the very least, we will provide a reward that will never be less than $1000.
It really is simple, OTP (One Time Pads) have long been identified as perfect encryption (secrecy). The only problem is that if the �same� OTP is used for two different messages, it can be broken.
CORAcsi has engineered MUPs (Multiple Use Pads) � our fancy term for OTPs that can be reused indefinitely without being broken.
Go ahead and try � use the same MUP, with CORA, on multiple messages and break it. We welcome your attempt. Let us know you are interested in breaking CORA using the online Feedback in the navigation bar above.
CORA-X lite has been designed to be used on home computers and servers so that this application is loaded on startup, then runs until the computer needs to be restarted.
The First time you start CORA-X, you will see this dialog box:
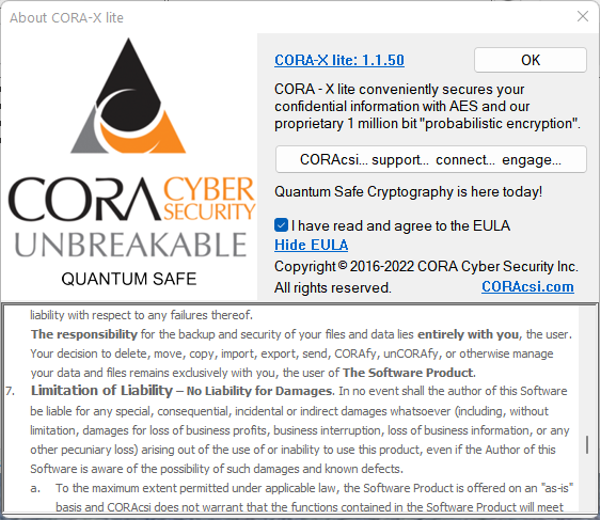
You must read and accept the End User License Agreement (EULA).
After accepting the EULA, you may close this Dialog and continue to CORA-X lite.
You may use the View EULA link at any time to read the EULA again.
CORA-X may be used from your device (HDD or SDD), or you may use it from a portable flash drive.

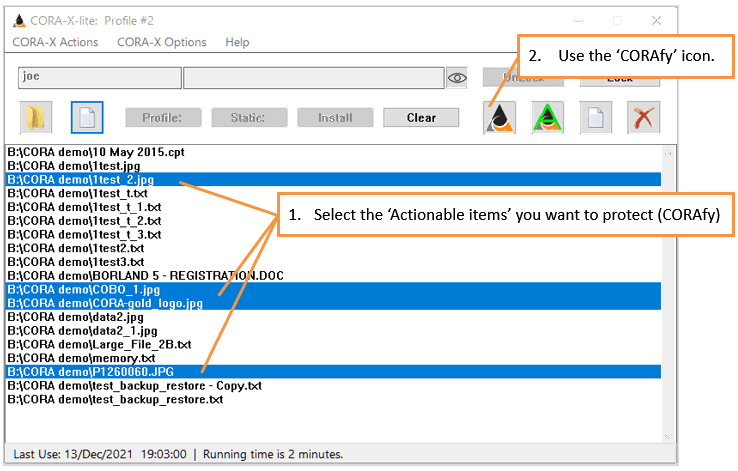
You are now ready to use CORA-X lite. Use the 'File & Folder' Actions to add 'Actionable items' to the List box.
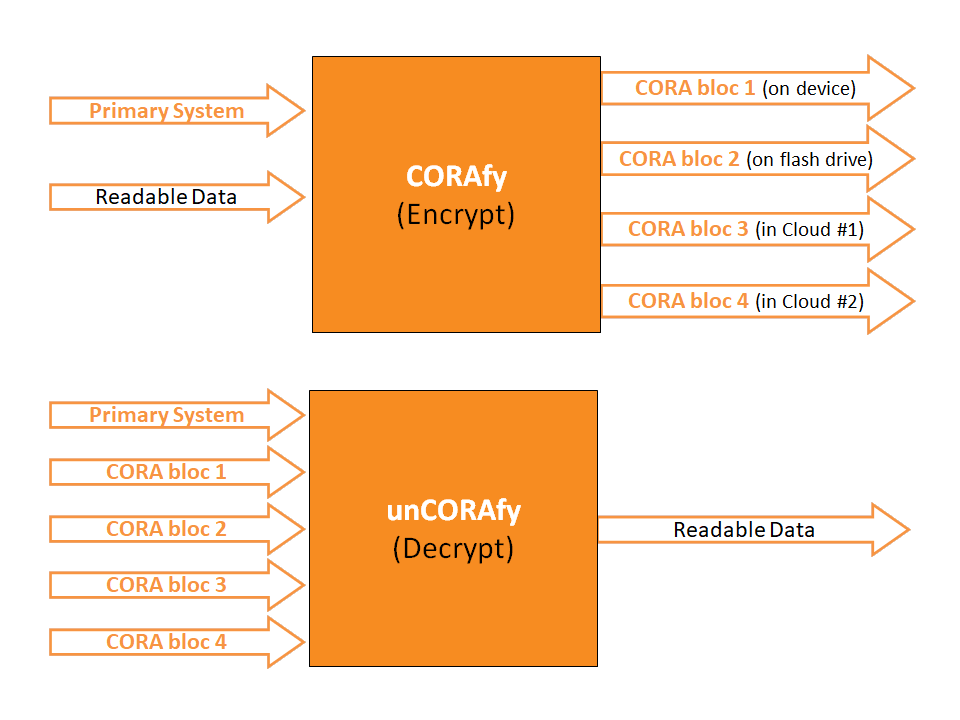
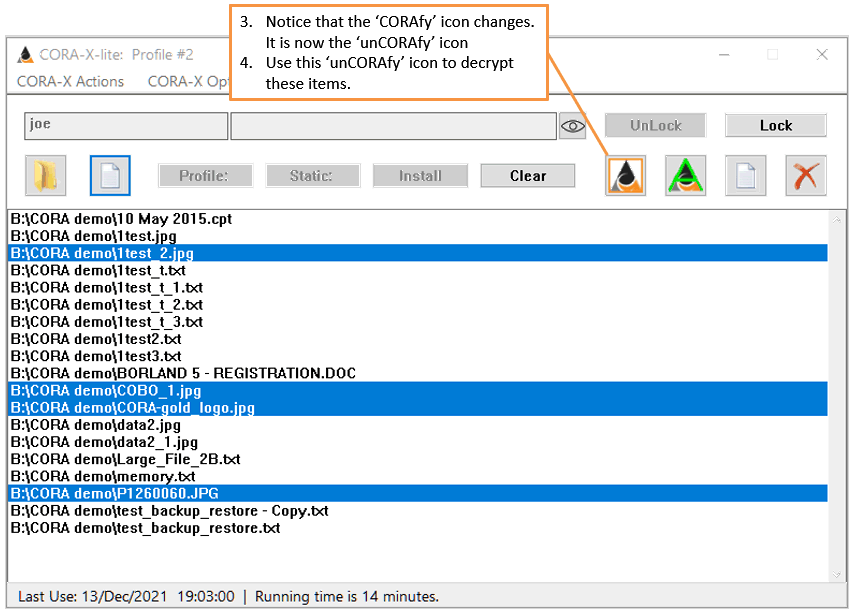
Once your Actionable items are in the List box, select the files you want to encrypt (CORAfy) then use the
![]() . Once the selected files have been CORAfied, this icon will change to
. Once the selected files have been CORAfied, this icon will change to
![]() . Select this icon again and you will unCORAfy (decrypt) the selected files.
. Select this icon again and you will unCORAfy (decrypt) the selected files.
Registration provides two important identifiers:
Registration requies the ability to connect to the Internet.
Registration provides a number of benefits, including but not limited to:
The same installation of CORA-X allows for one or more usernames. The same individual may create multiple usernames (profiles) to facilitate having different system files at different locations, and for different purposes.
For example:
The Main CORA-X lite Interface is also known as the Main Window.
The Sections that make up this Application are listed below in order from top to bottom:
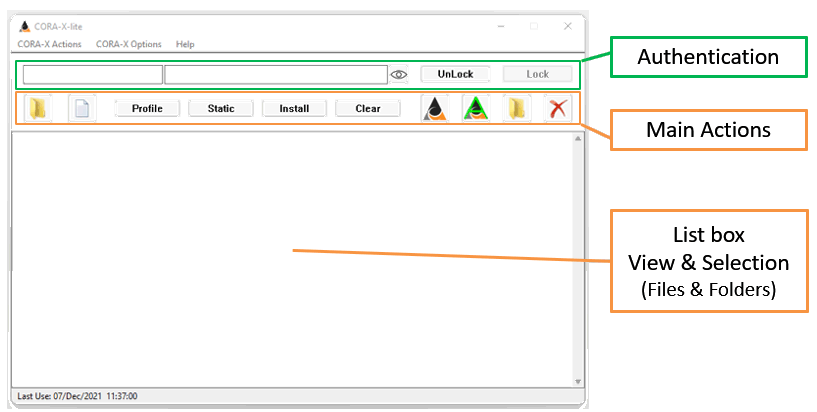
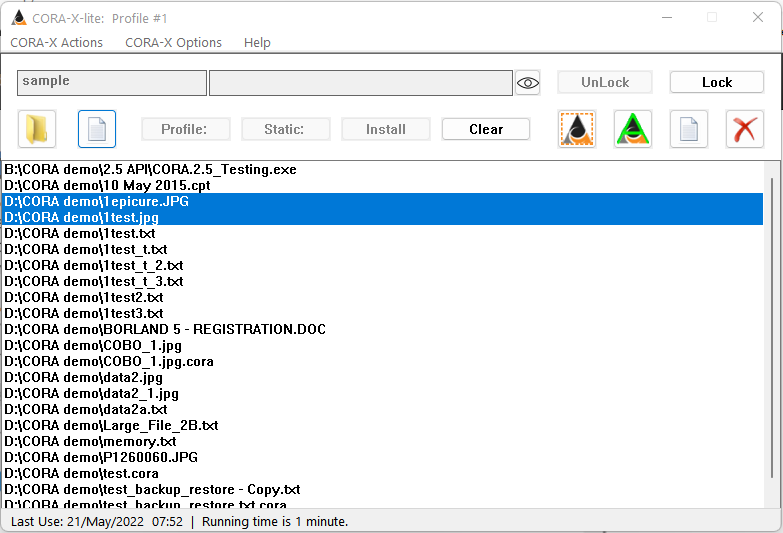
The First Textbox on the left is for your "User Name". Next to it is your password. The eye icon can toggle between viewing or hiding your passwords.
You may Unlock and Lock the access to CORA-X multiple times.
Ideally you will run CORA-X lite continuously, locking it when you are away from your desk and then unlocking it when you need to use it again.
For example, when 'the computer' starts up:
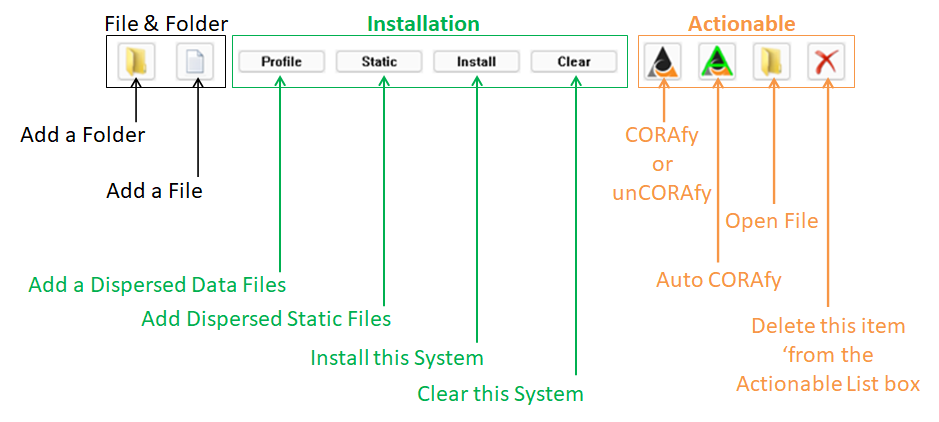
There are three groups of 'Main Actions': 1) Adding Files and Folders, 2) Installing the System, 3) Working with 'Actionable' Items.
The User must be signed in and have a System installed before adding or working on Actionable items.
Each System will maintain its own list of Actionable items. See "Profiles" and "Good for All: Users, Teams and Organizations" below.
While there may well be millions of files on your computer, not all of them are sensitive and need to be protected.
For those who require encryption of the entire drive, stay tuned for upcoming releases, however, CORA-X lite is intended for "lite" use which protects select files on your device.
You may select files and/or folders to add to the "Actionable List box". These are the items that may be selected and then:
Note: Folders that are acted upon will not include 'subFolders'.
This is the where you install the MUP (1 Million + bit encryption key) and related system files using CORA's "Disperse Files".
What good are encryption keys if a capable hacker knows where to look, or if it is kept in one piece on the same device?
Our "Dispersed Files" protect your System by placing them in separate pieces and ideally in separate locations (devices and/or the cloud).
There are two types of Dispersed Files:

See "Setup" below to understand 'how' you create your unique encryption key (MUP) and system.
You must sign in before Installing a system.
When you select Dispersed Files, the number of files selected is shown in the Button. If you select an incorrect Dispersed File, you may use the "Clear" button to remove them and start over.
Once your System is successfully installed:
Actionable items are shown in the main area (Listbox) of this application. In order to "act" on an actionable item, it must be selected. The files highlight in blue below may be acted upon.
 .
.
Select one or more files/folders in the Actionable List box.
If all of the Actionable items selected are currently "readable" (not encrypted), then the "CORAfy" button will appear as
![]() , and when selected, will CORAfy the selected items.
, and when selected, will CORAfy the selected items.
If all of the Actionable items selected are currently "CORAfied" (encrypted), then the "CORAfy" button will appear as
![]() , and when selected, will unCORAfy (decrypt) the selected items.
, and when selected, will unCORAfy (decrypt) the selected items.
If some of the Actionable items selected are currently "CORAfied" (encrypted), but not all of them, then the "CORAfy" button will appear as
![]() , and when selected, will unCORAfy (decrypt) those selected items that were CORAfied so that all selected items are the same.
, and when selected, will unCORAfy (decrypt) those selected items that were CORAfied so that all selected items are the same.
The "Auto CORAfy" button
 allows you to mark the selected 'Actionable items' to be automatically CORAfied when locking or closing CORA-X, and to be unCORAfied when unlocking with the System installed. Each System profile maintains a separate list of 'Actionable items' and 'Auto CORAfy' attributes.
If all of the Actionable items selected have previously selected "Auto CORAfy" then the button will appear as
 . If it is then selected all of the selected files will have this attribute removed.
If some of the Actionable items selected are currently "CORAfied" (encrypted), but not all of them, then the "CORAfy" button will appear as
 , and when selected, will unCORAfy (decrypt) those selected items that were CORAfied so that all selected items are the same.
The Open Action will open the 'Actionable items' in their default programs. If the item is currently CORAfied (encrypted), then it will first be unCORAfied (decrypted).
Example: you 'Open' a Microsoft Word document that has been CORAfied, then CORA-X will decrypt this document and then open it in Microsoft Word.
If the 'Actionable item' is a folder, then it will be opened using your default 'File Explorer'.
The following icons are used for this 'Open' Action:
 all of the Selected items are files
 all of the Selected items are Folders
 a mixture of files & Folders
The  action will remove the selected 'Actionable items' from the List box.
An item that is being removed and is currently CORAfied will be unCORAfied (decrypted) before being removed.
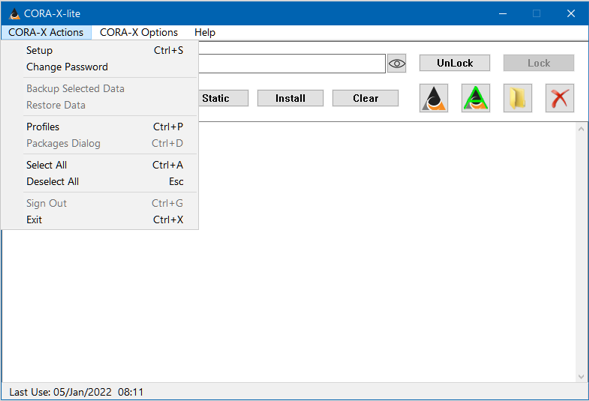
Keyboard Shortcut: Ctrl+S (hold the Ctrl key down while pressing the S key)
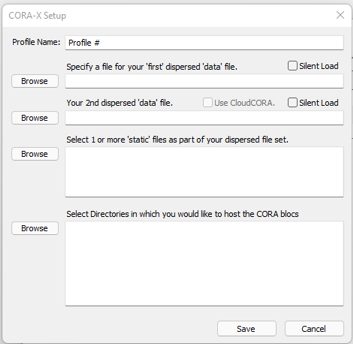
The Setup Dialog Window is used to create and modify System Profiles.

The first two 'files' (data1.jpg & data2.gif) are data files. The Silent load checkbox is used if you not want to find and enter these 2 files using the 'Profile' button during installation. While this is a faster way to Install a system, it is not as secure.
The next file is the static file '2011-08-03 16.50.38.jpg'. This static file must be found and entered with the 'Static' button when installing a Dispersed system. There is no 'silent' option for static files. If you use more than 1 static file, each of them must be found and identified when installing the Dispersed system files.
The final textbox allows you to select multiple directores to receive the CORA blocs.
Ideally these directories should be on different devices for optimal security.
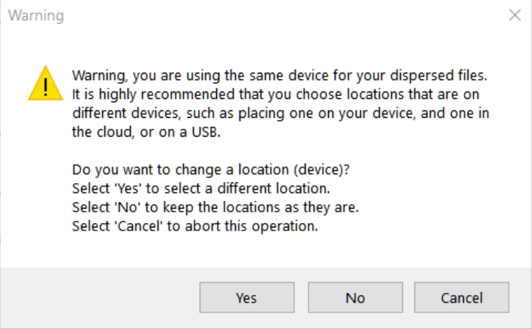
In this demo there is a single Directory (Folder) "CBs". Since this is for demonstration purposes, the author chose to disregard the warning and opted to have all CORA blocs saved to this single directory.
You may change your password. You will first need to confirm this action by entering your current password.
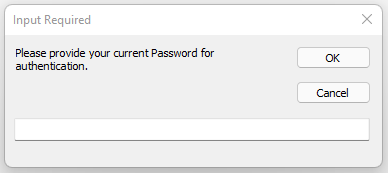
Once your current password is authenticated, you may enter and confirm your new password.
Note: once CloudCORA.com officially launches, there will be additional options and subscriptions to empower a highler level of security and redundancy. Until that time, you "must" safeguard and record you password; without a valid password it is impossible to load the System files and therefore decrypt your data.
This convenient action relies on the special Package named "Data Backup" and allows the user to backup the selected actionable items to a separate Package location.
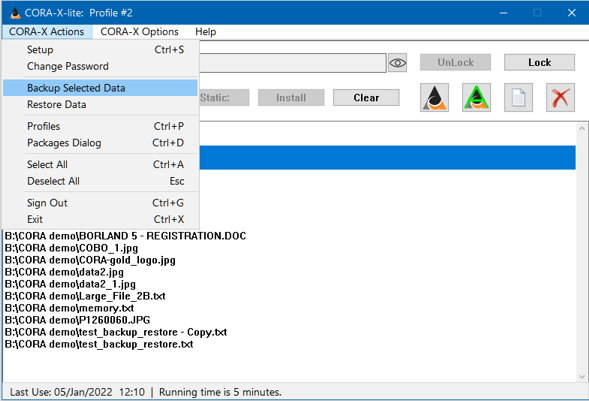
This action, unlike the CORAfy action, does not encrypt the original data, but rather, provides a separate, dated, secure copy of the selecte file(s).
Ideally the Package locations for these "Backups" will be in separate Cloud based locations. For example, as a Trust Independant backup solution, place 1 CORA bloc on Microsoft's OneDrive, and another in Google Drive.'
The catalogs for these backups are kept in a special folder available for being restored with the next, "Restore Data" action.
The name of a Backup Catalog has the following format: FileName.day_month_year__hour_minute.ext(file type).cora
For example: FamilyPortrait.01_Jan_2022__09_05.jpg.cora - is a backup of "FamilyPortrait.jpg" secured on Jan 1, 2022 at 9:05.
This action relies on the special Package named "Data Backup". When a user selects this action, a Browse dialog is opened to the Special folder in which each 'dated' Data backup catalog has been saved.
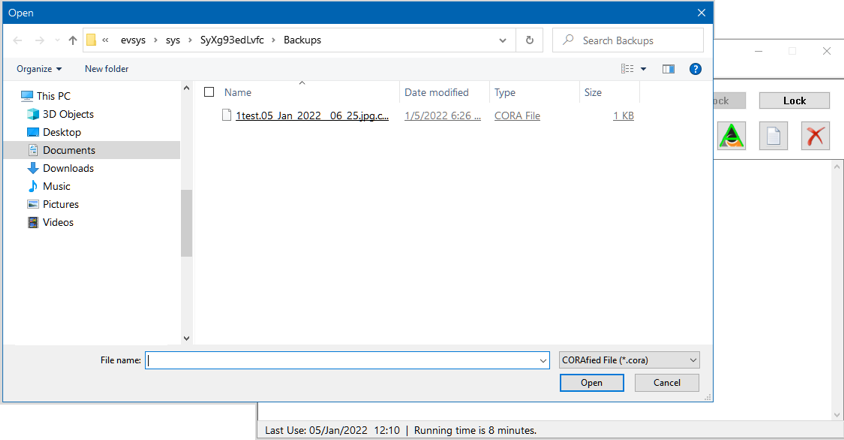
Select one or more Dated backup catalogs and restore the data that was original, securely, backed up.
After Restoring select files, the "Restore" directory will be opened in 'File Explorer'.
Keyboard Shortcut: Ctrl+P
This command opens the "Profiles Dialog Window". This will list your System profile first, and then any and all Imported Encryption packages.
This Window allows you to 'Auto load' imported files and to readily switch between Encryption packages. See the 'Profiles Dialog Window' below for more information.
Note: a single parent "System profile" may be in use at any given time. CORA-X does not allow you to Install more than one System profile. If you want to have access to additional System profiles, then you must export, and then import, such packages. This is by design.
Keyboard Shortcut: Ctrl+G
It is recommended that you use the Lock and Unlock buttons in the Authentication Controls section.
Sign out does more than 'lock' CORA-X. It will remove all Encrytion packages, uninstall your System profile, and then completely remove all authentication parameters including your 'user data'.
This essential returns CORA-X to the same state that it was in when you first started this application.
Keyboard Shortcut: Ctrl+B
This menu action opens the 'Backup and Restore' Dialog Window.
Keyboard Shortcut: Ctrl+O
This menu action opens the 'Options' Dialog Window.
This Dialog Window provides you with an alternative to selecting/deselecting the menu items included below:
For example, you may use the "Delete CORA blocs" menu item in this menu, or you may use the 'Options Dialog Window' to access this same property.
Keyboard Shortcut: Ctrl+E
You may export the Encryption keys (MUP+) once your System has been installed.
An Export is similar to a 'System Backup' except that with an export, only the MUP and related support files are included. The user preferences, Actional items list, and related authentication files are not included.
This empowers teams and organizations to share Encryption packages so that they may read and share secured data.
For example, the HR department would export their Encryption package, which is different than that used by the IT department.
Keyboard Shortcut: Ctrl+I
Import an Encryption package:
Keyboard Shortcut: Ctrl+M
This menu action opens the 'Security Messages' Dialog Window.
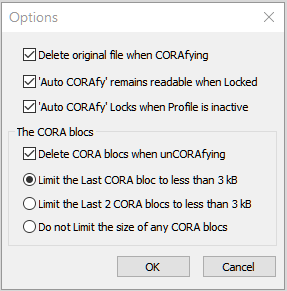
When selected and a CORAfied file is unCORAfied (decrypted), the CORA blocs used to encrypt this readable file will be removed.
If this is not selected, then the number of CORA blocs will increase with use. This holds an advantage if used "occasionally".
One of the advantages of CORA is that it becomes heuristically impossible to guess which CORA blocs go together in a particular solution. The greater the number of CORA blocs, the larger the number of permutations.
Remember that each combination of CORA blocs (2,3,4,12,21...) would require the "MUP" (Multiple Use Pad) to test; hence the 'impossible' rather than 'improbable'.
This opens another submenu in which you may 'limit' the size of the last 1 or 2 CORA blocs.
This is intended to be used when the 1 or 2 CORA blocs are being saved online (in the Cloud). For example, when CORAfying a large file, having 1 or 2 'small' CORA blocs saved to the Cloud increases security without having to wait for a long upload or download.
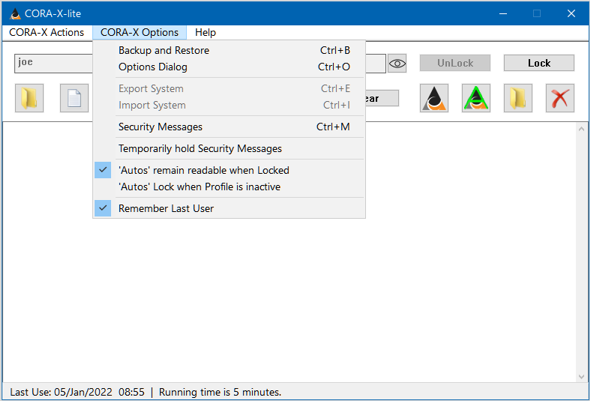
Normally 'Auto CORAfy' will encrypt the file when CORA-X closes, when the System is unloaded, or when CORA-X is Locked. This option allows you to keep your 'Auto CORAfy' items available when you Lock CORA-X.
With this option, you may comfortably lock your CORA-X and have access to the readable data. Then when you are done with using this readable data, you may manually CORAfy it, or wait until you exit CORA-X.
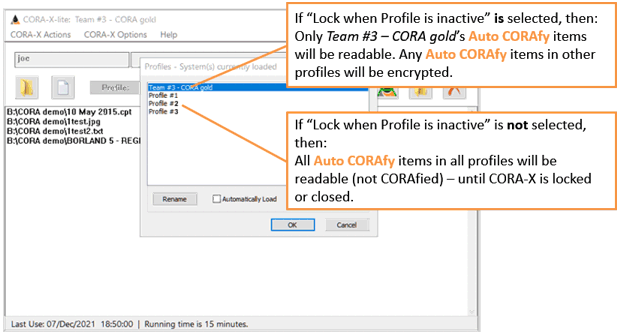
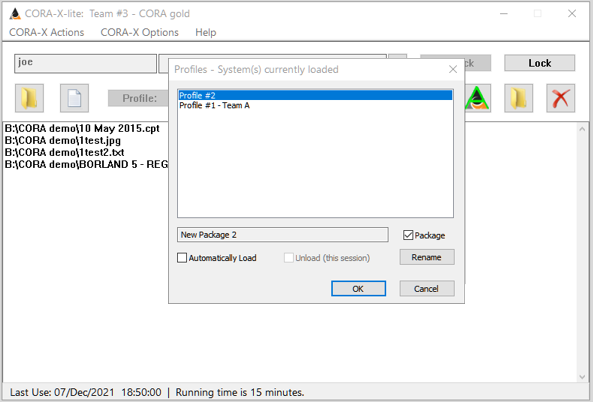
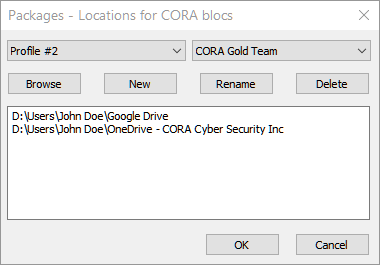
CORA-X allows you to switch between active profiles. For example, if your System profile is 'Team $3 - CORA gold' have 3 'imported profiles' loaded, 'Profile #1', 'Profile #2' and 'Profile #5', you may switch between these.
When you select 'Team $3 - CORA gold' as the active profile, then:
When this property is selected, there will be a checkmark next to this menu item.
When this is selected, the 'User name' of the last authenticated user will appear in the User name text field when CORA-X is started.
This menu action opens your Default Browser and loads the 'Frequently Asked Questions'.
This menu action allows you to provide Feedback about CORA-X lite.
In order to use this you needed to register with a valid email address. See the Report Manager
This menu action displays your password hint.
This menu action resets CORA-X lite to the state it was in before your first use.
Warning: Everything will be gone, your Authentication, User data and System Profiles will be deleted! You should have a Backup of your User data and System data, always, especially before doing a Factor Restart.
"If you do a Factory Reset", then you shoudl insure that 'all' of your data is unCORAfied (decrypted) before proceeding!
Keyboard Shortcut: Alt+?
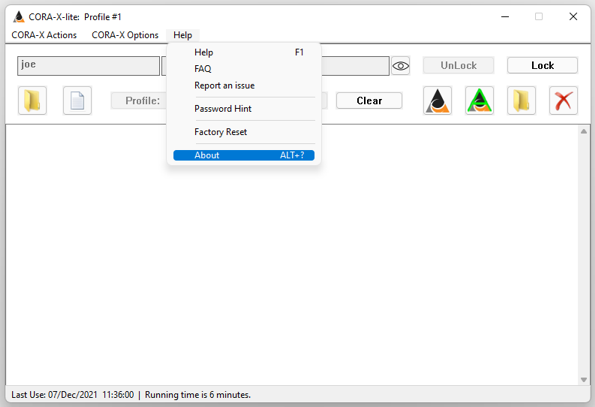
This menu action opens the 'About' Dialog Window.
The statusbar at the bottom of the Main Window should provide you with you important details:
Assuming your CPU's battery and clock are operational, this allows you to monitor the use of CORA-X within your account.
Dialog Windows are modal which means that they remain topmost until they are closed.
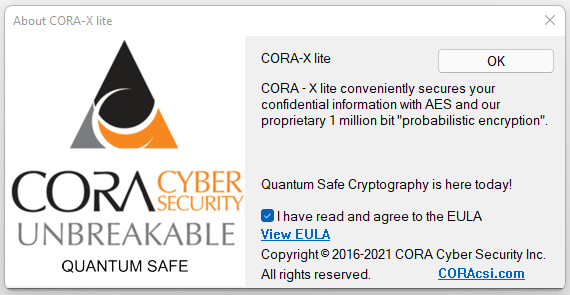
The first time you open CORA-X you must agree to the End User License Agreement (EULA). When the About Dialog Window is opened subsequently, you will may read the EULA again by selecting the "Show EULA" link
The first step in changing your password is to enter your currently active password.
If your password is properly entered, and the system has not been corrupted, then you will be prompted for your new password.
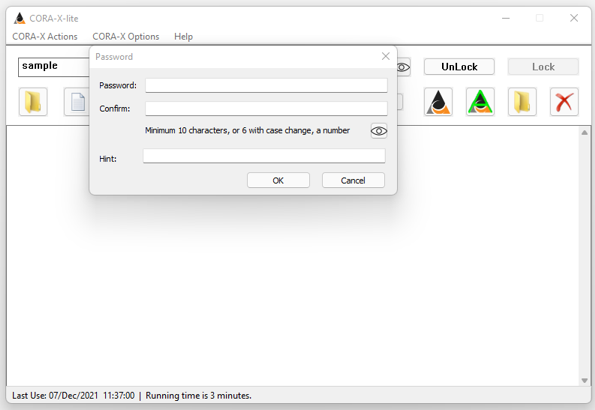
The minimum requirements for a password are one of the following:
Important - it is best to use a password that is 'more than' the minimum requirement!
Spaces are trimmed from the front and end of the password and do not contribute to the minimum requirement.
Next to Authentication (signing in), this is the most important process. Without loading your System profile, you cannot import other Encryption packages.
You may create multiple System Profiles, however, only one System profile may be active at any given time.
Dispersed Files are used to protect your MUP (Multiple Use Pad = encryption key) and supporting files. The bottom line for dispersed files is that they properly protect your encryption key (Encryption package):
The Silent Load feature allows user to more quickly Install their System profile by selecting Static file(s) only. It should be noted that this is a convenience feature that is not as secure as having to select the data files each time.
Each System profile must have at least one directory chosen for the CORA blocs. That said, having more directories, especially when placing them on different devices, or clouds, provide greater security.
Recall that in the Options Menu (and Dialog) you may choose to limit the size of the last 1 or 2 CORA blocs to between 1 and 3 kB which is particularly useful if you are saving these to the Cloud. In order to take advantage of these being sent to the Cloud, you should enter a Cloud resource as a second and/or third CB directory.
This Dialog window is an alternative to using the checked menu items in the Options menu.
This is a very useful Dialog. It allows you to:
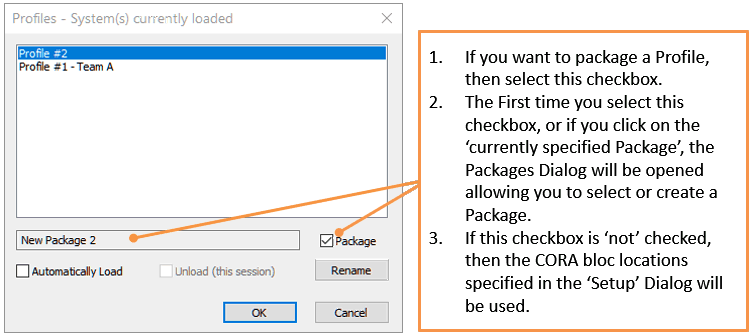
You may select a different profile using your mouse, and then use the "Ok" button to make that profile active, or you may double click on a particular profile name.
Notice that the Actionable list in the illustrations above and below have changed, depending on the Profile that is active.

Packages provide alternative locations for the CORA blocs used when CORAfying (encrypting) or unCORAfying (decrypting) 'Actionable items'.
Data Backup is a special Package built in to CORA-X. It is used with the Backup Selected Data CORA-X menu action and the Restore Data CORA-X menu action.
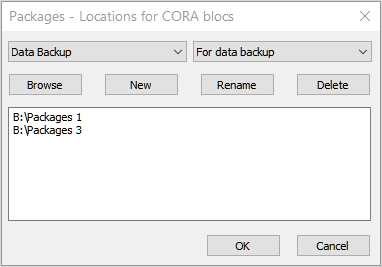
Important: this is an example and should never be used like this - in which both locations are on the same device. Ideally, especially for Data backups, one should use 2 separate "Cloud" based destinations so that if, the computer or device failed, you might recover your 'securely' backed up data.
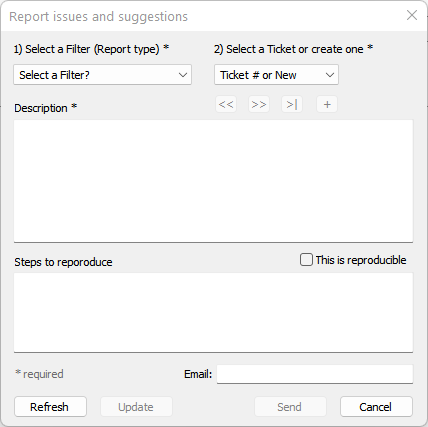
The 'Reports dialog' is an online ticket system that allows you to:
The Reporting engine requires that you have Registered with CORA-X.com.
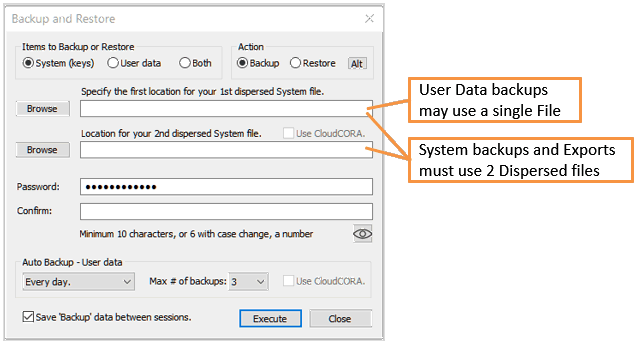
The Backup and Restore dialog is not about "data", but rather, the Encryption Package (key) and User data that is needed to encrypt and decrypt your data.
You should Backup your User Data and System data immediately. Keep good records about which files are used in each type of Backup and the password used for each Backup.
User data includes the files needed for 'Authentication' and the preferences that you have selected.
It must be noted that having a "password alone" is not enough! If one or more of these files are deleted or becomes corrupt, then you will not decrypt your secured data! It is absolutely essential that you backup your 'User data'!
You may use a 1 or 2 Dispersed Files for 'User backups'. While 2 dispersed files is always more secure, even 1 dispersed file will still be CORAfied (encrypted).
You choose the locations (directories) for your dispersed files, and CORA creates the filenames based upon the date and time of the Backup.
For Automatic, periodic backups of your 'User data', you will still select 1 or 2 locations for your backups, and must enter and confirm a password.
The Max # of backups limits how many 'automatic' backups are kept at any given time.
A System Backup will safeguard your Encryption package, Actionable list, Profile specifications and validation data. Contrast this to an Export which exports the Encryption package alone.
This Backup requires 2 locations for 2 distinct Dispersed files. You should specify 2 locations on separate devices; ideally one or both in the Cloud. For example, place on in Google Drive, and one in Microsoft's One Drive. Soon CloudCORA will offer advantages to those whose subscribe to our service, however, even then it is best to maintain a 'Trust Independant' policy in which you do not place all of your Dispersed files, (or CORA blocs) within a single Cloud or Corporation.
A password is required and must be confirmed. Hence to recap, in order to Restore a System backup, you must have access to both Dispersed files and to the password.
For Backups (and Exports) the Dispersed files will be given a filename that begins with the date and time of the backup, followed by a qualifier that identifies the type of backup:
For example:
05_Dec_2021__10_05_00.u.pcora is a manual User backup (single file)
15_Nov_2021__11_01_00.a.pcora is the first file in an automatic User backup
15_Nov_2021__11_01_00_2.a.pcora is the second file in an automatic User backup
01_Nov_2021__18_53_00.s.pcora is the first file in a System backup
01_Nov_2021__18_53_00_2.s.pcora is the second file in a System backup
27_Nov_2021__13_22_00.pcora is the first file in the Export of an Encryption package
27_Nov_2021__13_22_00_2.pcora is the second file in the Export of an Encryption package
Warning - this will overwrite all existing preferences and authentication data 'for this user'. Having this user's password is not enough to install a System Profile!
The ability to install multiple 'Encryption packages (MUPs)' is a powerful feature that can be used by all.
An Export/Import involves the "Encryption package" alone. It does not handle the Profile characterstics, Profile data, validation files or Actionable list.
The Encryption package is made up of:
The reason for CORA-X is simple - the absolute security of your data. Hence to import a profile (Encryption package), all of the following are needed:
There are many different scenerios by which users will benefit from using multiple profiles.
Create a 'Primary System Profile' for use with your most import files, like passwords, investments, etc.
Create a 'Portable' Profile for use when you are on the road, or in school.
Create an "Images" Profile for use with select images.
Create a "Videos" Profile
Create a "Gaming Profile"
Import the Encryption packages from your Images and Videos Profiles into your Primary profile.
Import the Encryption packages from your Primary Profile and your Gaming Profil into your Portable Profile
At home or on the road, you would Install your 'Primary System' profile
If you often use multiple "Team" Encryption packages, perhaps one from work, another for you side-business, and a third for volunteer work you are doing, then you would have these "Automatically" set to import. Then switch profiles quickly and easily as needed. When you switch profiles, only the Actionable items for that particular profile (team) will be loaded and actionable.
In a manner similar to how a Team might benefit from using different profiles, the same is true of an organization. That said, generally an organization might have a greater need for separating departments and teams, resulting in a greater number of Encryption packages.
Another benefit would be having greater control over access to these profiles. The Dispersed files need to be imported, and the passwords needed to import them may be controlled by the IT department according to best practices.
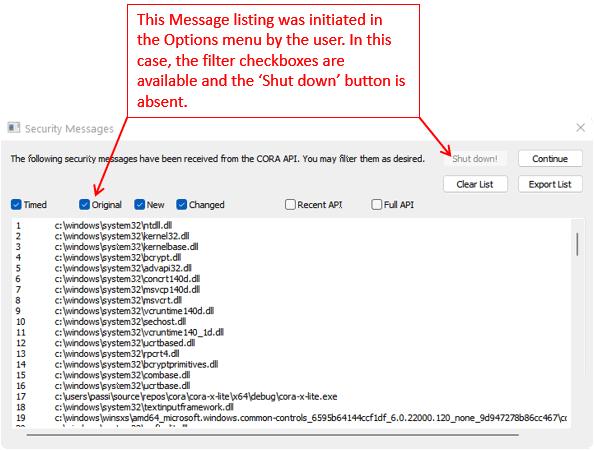
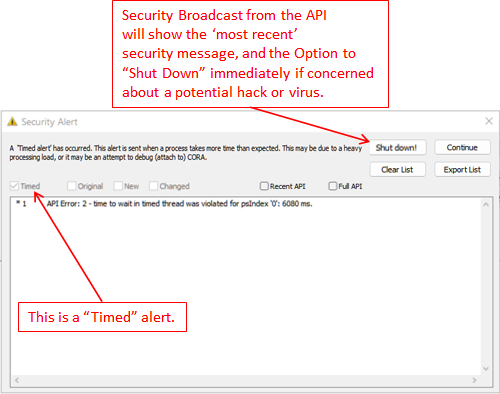
The Security Messages dialog will automatically appear when an alert is sent from the CORA API (unless you have selected "Temporarily hold Security Messages" in the CORA Options Menu). When this happens, only the 'new' messages will appear.
The "Security Messages" menu item will open the Security Messages dialog which will present security messages from the CORA API. These messages may be filtered:
The following is an example of a "Timed alert"; we 'might' obtained this particular alert by attaching a debugger to CORA-X lite, however, there could be other reasons as well, such as busy CPU, older CPU or limited RAM.
When it comes to securing your data so tht it is protected against hackers and quantum computers, you will want to CORAfy such files:
The CORAfy action button will use a dashed line to indicate that 1 or more of the Actionable files selected are CORAfied, and 1 or more of the Actionable files are not CORAfied. See Main Actions: Working with your 'Selected' files and/or folders.
What are your choices?
When 1 or more items have been seleced with "Auto CORAfy", then:
The Options that are currently selected in the CORA Actions menu, or the Options dialog box will be used to unCORAfy the selected files:
Warning - do not close CORA-X lite externally (force a shutdown) before it finishes processing previous actions. To avoid potential losses of information or corruption, you should only close CORA-X using the Exit Command or the Close icon in the Title bar.
These should be consider the very least that you "must do".
If you value your data, then do implement these Best practices.